What’s the Best Way To Stop a Dishwasher From Leaking Water?
페이지 정보
작성자 Aubrey 작성일25-08-18 19:11 조회3회 댓글0건관련링크
본문
What's the Best Way To Stop a Dishwasher From Leaking Water?
A spilling dishwasher can cause significant water damage to your kitchen if not addressed promptly. This comprehensive guide will walk you through the best methods to diagnose and fix the problem, whether the water is coming from the front of your appliance.
Common Causes of Dishwasher Leaks
Understanding why your dishwasher is spilling water is the first step to fixing the problem:
- Faulty Door Gasket: The silicone seal around the door wears out over time
- Improper Loading: Items blocking the door or spray arms
- Loose Connections: Water supply or drain hoses not secure enough
- Clogged Filter: Food debris blocking proper drainage
- Overfilling: Malfunctioning water inlet valve or float switch
- Cracked Tub: Damage to the dishwasher's interior lining
- Detergent Issues: Using the wrong type or too much detergent
Essential Tools for Repairs
Before you begin, gather these basic tools:
- Screwdriver set (Phillips)
- Adjustable wrench
- Flashlight
- Clean towels or sponges
- Bucket or shallow pan
- Replacement parts (if needed)
Detailed Leak-Stopping Guide
1. Identify the Leak Source
Before making repairs, determine where the water is coming from:
- Dry Everything: Wipe all surfaces completely
- Run a Short Cycle: Observe where water escapes first
- Check Common Areas: Door seal, hose connections, pump area
- Note the Timing: Does it leak during filling, washing, or draining?
2. Fix Door Seal Issues
The door seal is a frequent leak source:
- Clean the Gasket: Remove food particles and grease buildup
- Inspect for Damage: Look for tears or flattened areas
- Test the Seal: Close door on a dollar bill - it should resist pulling
- Replace if Needed: Order exact model replacement and install carefully
3. Check and Tighten Connections
Loose hose connections often cause leaks:
- Locate Connections: Typically at back/bottom of dishwasher
- Inspect Hoses: Look for cracks or worn areas
- Tighten Clamps: Use wrench to secure all connections
- Check Valves: Ensure water inlet valve isn't dripping
4. Clean the Filter and Drain
A blocked system causes water backup:
- Remove Lower Rack: Access the filter assembly
- Clean Filter: Wash under running water, scrub if needed
- Check Drain Hose: Ensure it's not kinked or obstructed
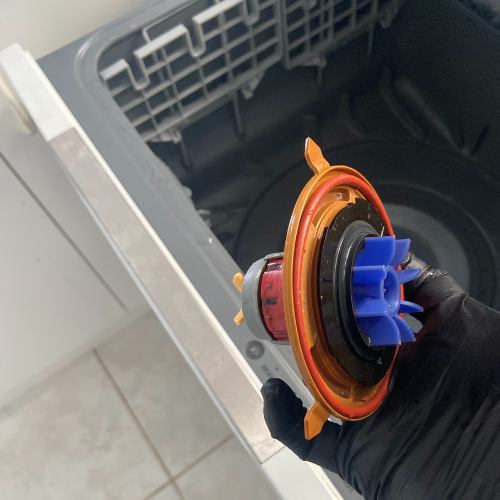
- Inspect Pump: Remove debris from the impeller area
5. Test Water Level Controls
Overfilling can cause leaks:
- Find Float Switch: Usually a small plastic device in tub base
- Check Movement: Ensure it moves freely up and down
- Clean Mechanism: Remove any debris obstructing operation
- Test Function: Manually lift float during cycle to stop filling
Advanced Troubleshooting
For ongoing leaks, check these areas:
1. Examine the Tub for Cracks
- Dry Interior: Wipe completely with towels
- Visual Inspection: Look for hairline fractures
- Leak Test: Pour water in different areas to locate source
- Repair Options: Use dishwasher-safe epoxy for small cracks
2. Evaluate the Water Inlet Valve
- Shut Off Water: Close supply valve under sink
- Disconnect Hoses: Have towel ready for residual water
- Test Valve: Check for continuous dripping when off
- Replace if Faulty: Install new valve matching your model
Preventive Maintenance Tips
Regular care prevents future leaks:
- Monthly Cleaning: Run empty cycle with vinegar
- Filter Maintenance: Clean every 1-2 months
- Proper Loading: Avoid blocking spray arms or door seal
- Gasket Care: Clean and apply silicone grease quarterly
- Check Connections: Inspect hoses annually
When to Call a Professional
Consider professional help for:
- Major tub cracks or structural damage
- Electrical component failures
- Internal pump or motor issues
- Persistent leaks after DIY repairs
- If appliance is under warranty
Safety Precautions
Always follow these safety measures:
- Disconnect Power: Unplug or turn off circuit breaker
- Shut Off Water: Close supply valve before working
- Dry Hands: Never handle electrical components when wet
- Use Proper Tools: Insulated tools for electrical work
Conclusion
Stopping dishwasher leaks is often manageable with proper troubleshooting. By inspecting the most likely causes - door seals, hose connections, drainage system, and water level controls - you can usually identify and resolve the issue. Regular maintenance is key to preventing future leaks and prolonging your appliance's lifespan. If you loved this write-up and you would such as to obtain additional information relating to Professional dishwasher repair Melbourne kindly browse through our own page. For complex issues or if you're uncomfortable about DIY repairs, don't hesitate to contact a professional appliance technician.
With these methods, you can keep your kitchen water-free and your dishwasher operating properly for years to come.
댓글목록
등록된 댓글이 없습니다.